Showing posts with label Crochet Pattern. Show all posts

Saturday, 29 August 2015

Fairy tale bed spread

Hello everyone,

Right now I am at 80% of my current project. And it is really pretty and worth it.......but it takes me a loooooong time to finish it. I am avoiding my urge to start a small project in between. 
The risk might be there that I am putting this project down and not pick it up.
It is almost done, just a few more rows and border.

But!
Yesterday I received an email from Naomi. A lovely email with some pictures attached of a seriously pretty bed spread she made, using my fairy tale cowl pattern.


I just had to share this very nice picture with you. Perhaps it wil get you inspired for another use of the Fairy Tale pattern.


Naomi used my pattern and added a scallop edging.
At this page you can find all kinds of free scallop edging patterns.

The yarn she used is Stylecraft special DK. I use that yarn myself for blankets and colourfull softies

It isn't too expensive and will put a smile on your face while using it.
It is a good quality 100% acrylic yarn.


Would you like to try the pattern yourself?


The Fairy Tale Pattern can be found by clicking on THIS link.


Saturday, 4 April 2015

Romantic Poncho


I think this is a great piece of garment to add to your spring wardrobe.
Airy but yet adding a bit of warmth when you need it.


You can turn it into any style by selecting the yarn that fits your mood.
For this piece I used a yarn with a sparkle, 
It is really subtle but reflects when sunbeams hit the poncho.


The poncho works up really quick. It took me 3 evenings.
And since it is so easy to crochet... you can easily watch a movie while you work on it.

The pattern for this poncho is free and can be found over here

Make sure your starting chain is a multiple of 8! 

Since I received some requests for writing the instructions down, instead of the schematic, here it is: 

The exact translation of the schematic:
I use US crochet terms!

Stitches used:
CH : Chain
DC: Double crochet
Sl St: Slip stitch


1. Crochet your neck by making a chain that exists of a multiple of 8, Sl st to 1st CH


2. CH3, 2DC, CH1, [3DC, CH1] to end, Sl St into 3rd CH of 1st CH3 (of course you can also use a Chainless starting DC to start with instead of the CH3)

Your last chain space will be the increasing space, search for the space on the exact opposite and mark it with a stitch marker.

3. CH3 (or chainless starting DC), 2DC (in last chain space of formar row), CH1, [3DC, CH1] untill you reach the marked CH space, [3DC, CH1, 3DC] in marked CH space, [3DC, CH1] untill you reach the first space you worked in, add [3DC, CH1] to this space and Sl St to 3rd chain of your starting CH3. (or Sl St to your chainless starting DC)

When you look at the schematic (row 3 is the yellow row) The 3 circles are the starting CH3, the stretched crosses are DC's, so it is CH3 plus 2DC in same chain space)

4. Repeat row 3 untill your poncho reaches the desired length.


The additions I made to the schematic are:

1. Start with Chainless DC's, this way the opening for the head will be flexible. (with a stretch)
2. After you finished your last row, add a row of slip stitches on the edge. This way it will get a bit of extra body.
3. To the top, add a row of SC's and then slip stitch over that round, again to add a nice finishing touch and toughness
4. Add tassels


If you don't crochet but would like to have this poncho.
Just contact me.


Sunday, 1 March 2015

Flower Power Stoolcover


In search of some felt tip pens for my kids, I went to our local "dollar store", in Holland it is called "Action". It is one of those shops I never walk out empty handed. As always.... I bought more items than I needed. 
Felt tips, big candles, plasic container and!!... a cute stool.
As soon as I laid my eyes on it I thought about the option to give it a personal crochet touch.
It is such an easy project and so much fun to make. 


In this blogpost I give you some basic instructions. If you make one yourself, you need to alter your crochet work to fit your own stool. That might mean you have to add or loose a row (or more).
The number of rows you have to crochet depends on:

  • size of the seat of your stool
  • thickness of your yarn
  • crochet stitches you use for your seatcover
Since all of these points are up to you, please read this tutorial as a general instruction. Use your own creativity to finish your crochet stoolcover.


For my crochet stoolcover I used:

  • 6mm crochet needle
  • Lana Grossa Mc Wool - cotton mix 80

I write my tutorial using US crochet terms.
Stitches used:

SC: single crochet
DC: double crochet
Sl st: slip stitch
CH: chain

Instruction DC Clusterstitch:

* YO, insert hook in stitch, YO, pull up loop, YO, pull through 2 loops on hook (do not finish DC), YO, start next DC the same way (YO, insert hook in same stitch, YO, pull up loop, YO, pull through 2 loops on hook) *, now finish your DC cluster by, YO, pull through all loops on hook.

Depending on how many DC's you need in your cluster, repeat between * *

General tips:

1. Check the tension of your rounds while you are working. When you think they become too tight, start your round again but add a chain (extra) in between you stitches. This doesn't effect the outcome of your work. In the next round you will cover those extra chains with a stitch.

2. Use any granny stitch you like! Let your creative mind go. Just keep in mind you need to add extra stitches in every new round to make the circle grow.
3. End every row by using a Slip stitch in the first stitch or chain-space of the round. 

4. Change of colour can be done after your slip stitch to end the round OR finish off every round and add a new colour in any stitch.

5. The first DC of any round can be done by using a Chainless Starting DC
5. Don't worry if your circle isn't 100% flat. It will stretch when you fasten it on the seat. Or! you can always block it.
6. Keep adding rounds untill you reach the edge of your stoolseat. At that point you will no longer add extra stitches. Just SC around untill you can cover the edge.


Stitches used in my pattern:

1) 8 SC in Magic Ring                                         (8)

( for this and every row following > sl st in 1st SC, CH1 )

2) 2 SC in every stitch                                         (16)

3) 2DC cluster in every SC                                 (16 clusters)

4) [SC, CH] in every DC cluster                        (16 sc plus 16 spaces)

5) [3DC cluster, CH2] in every chain space       (16 clusters plus 16 spaces)
  
6) [SC, CH2] in every DC cluster                       (16 sc plus 16 spaces)

7) 3DC (no more clusters) in every chain space ( 66 )

8) [SC in between the 3 DC's, CH3]                   (16sc plus 16 spaces)

9) Work into chain space:  [2DC, CH1, 2DC] 16 x

10) [DC in SC of round 8, CH1, SC in chain space of row 9, CH1] 16 x

11) [2DC cluster in every chain space] 32x         (32 DC clusters)

12) [SC in chain space, CH2] 32x                        (32 SC plus 32 chain spaces)

13) [3SC in chain space, SC] 32x                         (128 SC)

Row 13 was my final round. If you have not reached the end of your stool seat yet, you can continue with a [SC, skip3, CH4] and then add clusters in row 15 again.... but that's just a suggestion.

In your final round you should use SC's to make a solid edge to fold your crochet work around your stool.

Keep using SC's around as long as you need to fold your work nicely around the edge.

In your final round, add an elastic band inside your SC's. To do this, SC over the elastic band, that way it disappears inside the last round. Use an oversized piece.

Finish off.

Place your crochet work on the stool, tilt the stool up-side-down, pull the elastic band tight and close with a knot. 


Your home -made flower power stool is finished! I'd love to see yours if you finished one.


If you do not crochet but like one yourself, just let me know.


Wednesday, 25 February 2015

Royale Squares & Stripes wrap


I fell in love with this yarn instantly.
Not a clue what I would make with it but I just had to have it.


Since the coldest period of winter in Eastern Europe seems to be over, I decided to create a piece of "crochet-art" which can be used in this in-between period. A warm wrap to use during colder evenings.


I have written down the pattern for you. 
It is a very easy pattern, I hope you enjoy it!

To add to your Ravelry que, click the ravelry image


Stitches & terms used:

SC: single crochet
DC: double crochet
CH: chain

Yarn used:

Wibra Fenna Yarn
Suggested needle size: 4 - 4,5 mm ( I used a 4.5 mm hook)
100% acrylic

Use any yarn you like plus hook as suggested. 


Pattern:

The width of your wrap depends on the yarn you use incombination with the length of your base chain. Your base exists out of a multiple of 3 + 3.

With my yarn I made a base chain of 84 chains.


1) DC in 3rd chain from hook, DC back over your base chain, turn (82 DC)

2) Chainless starting DC, CH2, skip 2 stitches, DC, [CH2, skip 2, DC] repeat between brackets to end, turn

3) repeat row 2

4) Chainless starting DC, DC in every stitch to end, turn

5) repeat row 4

Graphic chart of pattern
The pattern is repeating itself. In the graphic you can see how it repeats. 
Keep repeating row 2 twice, followed by row 4 twice.

You last row should be one row of DC's. Just like you started.

Finishing:

When you've made your final DC, turn and SC around the complete border of the wrap.
In every corner you place a SC, CH2, SC, this way you get nice square corners.

Your final round along the borders should be:

SC along the long sides of your wrap             
[SC, CH2, skip1] along the short sides (picture)


[SC, CH2, skip1]
Finish off.

Before you add your tassels, you might want to block your shawl / wrap.
It really makes a nicer result. I usually pin large items down on the carpet and spray it with water. It usually dries in one night.


Now you can add tassels through the CH2 spaces along your short boders if you like.


Enjoy!

Wednesday, 11 February 2015

Loving Black & White


Just a nice pattern with some tips on crochet techniques


Stitches & terms used: 

YO: Yarn over
SC: Single crochet
DC: Double crochet
SLST: Slip stitch
CH: Chain

FPdc: Front post double crochet:

YO, insert hook into space between the post of the current and next DC in the row below, bring the hook through the nest space, going behind the the post, YO, pull hook through the spaces (3 loops on hook), YO, pull yarn through first two loops on hook, YO, pull through last two loops. done


RevSC: Reverse single crochet

Reverse Single Crochet

Pattern

1) Double Crochet chainless foundation chain of 90 DC's (instructions can be found over HERE)

2) CH2, FPdc around, SL ST to 1st DC (skip the Ch2 to SlSt in 1st DC)

3) In this row you start with the heart pattern. Repeat row 2 BUT, attach white yarn in the 46th stitch.

changing colour in a DC, do your DC as normal but your last YO should be with your new colour so the last loop you pull through is the nw colour.

Start the heart pattern according to this diagram, you start at the bottom. Every box is a stitch.

So in row 3 you switch back to black immediately.


4) Use the same technique as used in row 3 but follow the heart pattern to see where you change colours.

5 / 14) Continue untill you have all rows with the heart pattern

15 + 16) Only use black, repeat row 2

17) CH1, SC around, SlSt in 1st SC

18) RevSC around, finish off


Attatch yarn to the other side

19) CH1, SC around, SlSt in 1st SC

20) RevSC around, finish off


I also made matching Bootcuffs.

I made these, based on the brooklyn boot cuffs pattern by CrochetDreamz.


Have fun!

Wednesday, 4 February 2015

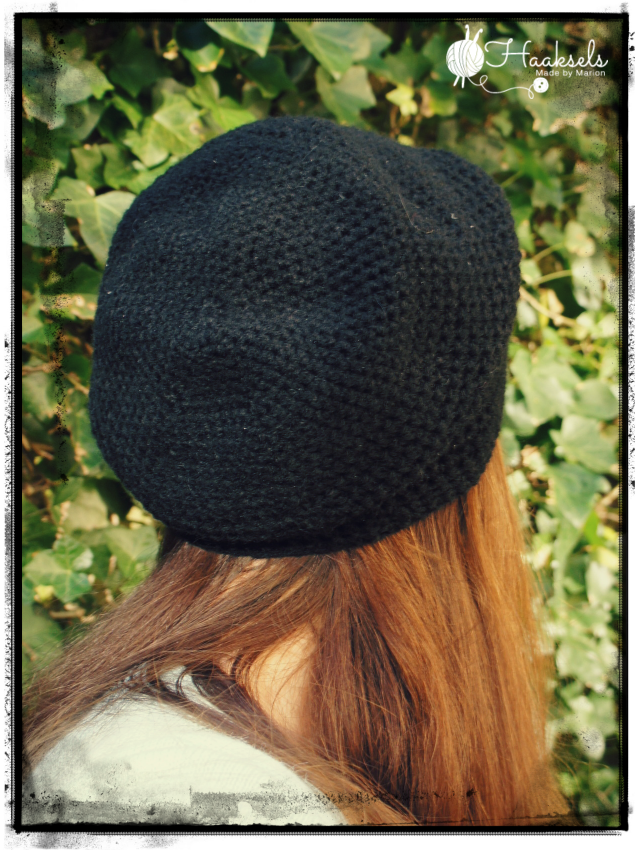
Slouchy Flip-it Beanie


A slouchy beanie made with a reasonably thin yarn. This makes the texture come out nicely.
It also creates a slightly less thicker hat than your typical winter hats. But by using a nice warm yarn, containing wool, you will still have a hat that is warm enough.

Click on Ravelry image to add to your que
Yarn used: 225 m. Baby Wool Light colour Black from www.haakselswolwinkel.nl
Gauge: 18 stitches and 26 rows on 10 cm x 10 cm (4' x 4')
Hook used: G - 4 mm
Size made: Adult

Stitches / terms used:
The pattern is written in US crochet terms.
SC = single crochet
ESC = extended single crochet
ST = stitch
CH = chain
YO = yarn over

Extended Single Crochet:
Insert your hook into next st, pull up loop, YO,
pull up through first loop on hook, YO again,
pull through the remaining 2 loops on hook.

ESC increase: 
2 ESC in same ST

ESC decrease:
Insert hook in next ST, pull up loop, insert hook in next ST,
pull up another loop (3 loops on hook), YO,
pull through first 2 loops on hook, YO, pull through last loop.

If you want your hat to fit on a smaller hat then stop increasing
sooner than pattern. If you are using a yarn with
the same thickness I would suggest:

Male: follow pattern
Female: stop after round 15, pick up pattern from round 17
Child: stop after round 11 (or 13), continue at round 17
These are only suggestions! Please adjust according to your own liking.


Pattern

Start with a magic ring, (I prefer a Double Magic Ring, it is a bit more firm)
Every round that starts with a CH1, start your first SC in the same ST.


1) 10 SC in Magic Ring, SL ST to 1st SC (10)

2) CH1, increase in every SC, SC into your SL ST of round 1  (21)

3) CH1, SC around, SL ST to first ST (21)

4) CH1, [2 SC, increase] around, SL ST to 1st ST (28)

5) CH1, [3SC, increase] around, SL ST to 1st ST (35)

6) CH1, [4SC, increase] around, SL ST to 1st ST (42)

7) CH1, [5SC, increase] around, SL ST to 1st ST (49)

8) CH1, [6SC, increase] around, SL ST to 1st ST (56)

9) CH1, SC around, SL ST to 1st ST (56)

10) CH1, [7SC, increase] around, SL ST to 1st ST (63)

11) CH1, SC around, SL ST to 1st ST (63)

12) CH1, [8SC, increase] around, SL ST to 1st ST (70)

13) CH1, SC around, SL ST to 1st ST  (70)

14) CH1, [9SC, increase] around, SL ST to 1st SC (77)

15) CH1, SC around, SL ST to 1st ST (77)

16) CH1, [10ESC, increase] around, SL ST to 1st ST (84)

17/26) CH1, ESC around, SL ST to 1st ST (84)

27) In this round you should make 4 ESC decreases. Even them out. (see pic.1)
       CH1, ESC around including 4 ESC decreases, SL ST to 1st ST (80)

Pic. 1

28) Repeat row 27 (76)

29) CH1, ESC around, SL ST to 1st ST (76)

30) CH1, In this round you should make 2 ESC decreases. Even them out. (see pic. 2)
       CH1, ESC around including 2 ESC decreases, SL ST to 1st ST (74)

Pic. 2

31) Repeat row 27 (70)

32) CH1, ESC around, SL ST to 1st ST (70)


Now continue repeating row 32 untill you reached your desired length. 

I continued untill the hat had a length of +/- 30 cm. In total I made 28 rounds of ESC stitches. Last 4 rounds: SC around and finish off, you can of course add any border you prefer.

Now turn your hat inside out! Tadaa


Click on this image to get this yarn

Saturday, 31 January 2015

Blue Lagoon Mittens


How nice it is to design your own mittens. matching your new wintercoat or spring jacket!


Thanks to THIS pattern by Brenda Anderson, you can make as many as you like
I made this specific pair on order for a colleague of mine.
As you probably noticed....her favorite colour is ocean blue.


TIPS:

If you think the bottom of the mitten is too wide, just add extra rounds after you're finished.
I addes 3 SC rounds and added an elastic band in the second round.

I also add extra strength to the section between the thumb and the hand, just take the yarn you are using for the glove to sew that part together a bit more,

The bow is an extra finishing touch.
HERE you can find the pattern of the bow by Jess.

Enjoy your new mittens.


Sunday, 25 January 2015

Soft winter hat & scarf pattern


Since I have been making this hat several times and found out it is actually so easy to make, I decided to write down this pattern so you can all enjoy this soft winter hat.

This pattern is written to make a hat for a toddler / child. I used a 10mm crochet hook and matching yarn.
 To make a larger hat, add a multiple of 2 chains to the base chain. Also add extra rows without the HDC-Vst decrease. That way your hat will become "higher".


Click on Ravelry logo to add to your Ravelry que

Stitches & US terms used:

HDC-Vst: half double crochet V-stitch
SC-Vst: single crochet V-stitch
Decr.: decrease
CH: chain
ST: stitch
SL ST: slip stitch
SP: space
SK: skip chain
YO: yarn over

Pattern uses a 10mm crochet hook and 9-10mm bulky yarn.

General:

This pattern uses V-stitches. You start every V-stitch in the same stitch as where you ended your previous V-stitch.

Pic. 1

Stitch instructions:


HDC-Vst: 
YO, insert hook in same SP, pull up loop, (3 loops on hook),
YO, SK1, insert hook in next SP, pull up a loop (5 loops on hook),
YO, pull yarn through all loops.

HDC-Vst decrease: 
YO, insert hoop in same SP, pull up a loop (3 loops om hook),
Insert hook in next SP, pull up loop (4 loops on hook),
Insert hook in next SP, pull up a loop (5 loops on hook), YO, pull through all loops.

SC-Vst:
Insert hook in same CH, pull up loop, insert hook in next CH, pull up loop, YO, pull through all loops.

SC-Vst decrease:
Insert hook in same CH, pull up loop, insert hook in next CH, pull up loop, insert hook in next CH, pull up loop, YO, pull through all loops.

Pic. 2
Pattern:

0) CH 32 (the lenght of chains should be about 45 cm, stretched a little), SL ST into the 1st CH.

1) CH1, start your 1st HDC-Vst in the last CH of previous round. (see pic.1),
[CH1, SK1, HDC-Vst] repeat between [...] to end. CH1, SL ST into top of 1st HDC-Vst.

Your last HDC-Vst will end in the ST you used 1st in this round. 
From now on you will crochet in the CH1 spaces you created between the HDC-Vstitches.

2) CH1, start your 1st HDC-Vst in the last SP of previous round. [CH1, HDC-Vst] repeat between [...] to end.  CH1, SL ST into top of 1st HDC-Vst.

3 & 4) Repeat row 2

For a bigger hat or when you use smaller yarn, add more rows untill the hat reaches the desired height. When you want to create an egde as I did in the Blue / Pink hat, add another row.


5) In this round, you use 2 HDC-Vst decreases.
CH1, start your 1st HDC-Vst in the last SP of previous round, CH1, HDC-Vst, HDC-Vst. decrease,

Fold your hat in two to find our where your 2nd HDC-Vst decrease should be. (check pic.3)

Pic. 3
[CH1, HDC-Vst] to the other side, CH1, HDC-Vst decrease, [CH1, HDC-Vst] to end, CH1, SL ST into top of 1st HDC-Vst.


6) In this round, you use 4 HDC-Vst decreases.
Use same technique as used in round 5, this time HDC-Vst decrease as shown in pic. 4.

Pic.4
In this pattern you end up with 5 HDC-Vstitches and 4 HDC-Vstitch decreases.
Don't worry about the extra HDC-Vst.

7) In this round you use the SC-Vst.
CH1, SC-Vst, starting in same ST, [SC-Vst] to end. SL ST in 1st SC-Vst.

8) SC-Vst decrease around. (see stitch instructions), SL ST to 1st SC-Vst.

Pull up a long loop through last ST. Use this to close the hole. Pull yarn inside and finish off.


Edging:
Now you can add any edge you like.

Blue hat:
Attach your yarn to the base chain of the hat.
1&2) Create 2 rows of SC's. Finish off.
3) SL ST around in the 1st made row. Finish off

Pink / blue hat:
You have added an extra row 2! (HDC-Vstitches) so this hat is a row taller.
Attach yarn to the base chain.
1) SL ST around.
2) Reverse SC in the top loop of the SL stitches made. Finish off


Scarf:
The scarf uses the same stitches as the hat without the decreases.

1) Chain a base chain as long as you desire, be sure to use a multiple of 2 chains, SL ST to 1st CH.
2) SC around
3) CH1, HDC-Vst around as done in hat pattern row 1., SL ST to 1st.
4/6) Repeat row 2 of hat
7) SC in every CH around, finish off

Enjoy!

If you like to keep inspired and receive blog updates, please like my Facebook page